
Awesome Water® Help Line And Repair Manual
FOR HELP LINE CALL:
1800 886 819
Repair issues are varied so we will list the machine and technical issues from top of the machine to the bottom, front to back.
_______________________________________________________________
_______________________________________________________________
About Repair Manual
This repair/maintenance manual is designed to inform franchisee’s as much
as we can about the workings of the machine.
The likely problems and in more cases how to remedy.
We will describe opening the machine once and then the process will be referred to when required as “open the machine”
_______________________________________________________________
Below is the control pad on our older style Awesome Water® Cooler

OPENING THE MACHINE.
Turn off the power and pull the plug.
Empty the machine via the taps until the
water level is below the spindle.
Take top 2 screws from the back of the hood, lift, twist and pull the hood off & hang behind the machine.
(check the port connections when replacing the hood later ass detached port leads will give ER message on the display) take 4 screws from the front panel (two behind the drip tray) you can then snip the cable tie on the hot pipe and roll or pull of tubing.
Swing the front panel around and out of the way.
You can take the cold off as well and set
the front panel out of the way if you wish.
_____________________________
AWESOME COOLERS FILTER BOTTLE
FLOAT VALVE FAILURE – LEAKING
The float valve spike ascends and stops the flow
of water entering the reservoir of the cooler.
In most cases of float valve failure the customer has
failed to maintain the machine and an accumulation of grime
has built up over time causing the float valve to jam and fail.
It is possible that the nylon spike can be
change shape so check that too.
Either way the water level rises and has nowhere else to go and begins to spill out of the machine leading to other problems with water damage on the main board or wiring.
In most cases this can be rectified over the phone, but if you
are at the location the float valve should be cleaned with
HOT water and a clean cloth.
Re-screw the valve tightly and test that it works correctly.
If over flow persists examine the float valve to see if the
washer separating the valve from bottle is secured also.
If still not clear, replace float valve.
_____________________________
LEAKING BETWEEN THE TOP BOTTLE
Water can seep in between the top section of the bottle and
the white partition, which is usually caused by a
missing or misaligned O-ring washer.
Water can get trapped there and flow through the two air holes resulting in tap water entering filtered water.
To fix the situation ensure that the nylon washer is placed correctly over the hole as to not allow water to seep in between the gaps.
______________________________
RUBBER SEAL OF THE FILTER
The rubber circular band of the filter which seals the filter to the white partition when screwed in tightly can be a cause of seepage. The rubber seal can warp with age or change in temperature
thus causing a gap between the filter and the white partition.
Water may leak down the side of the filter,
allowing tap water to mingle with filtered water.
In some cases the filter may dislodge enabling
it to fall from the screw in section.
This may because the screw in section of the white partition
has warped from time or heat, in such a case the partition
needs to be replaced and not the rubber seal.
______________________________
GREEN FILTERS AND BOTTLES
Many filters and bottlers go green from lack of cleaning,
neglect and in particular sunlight.
An old filter is more susceptible to contamination as too
a dirty bottle compared to a clean bottle, but green is really
only possible with light or reflected light.
To fix or prevent such a problem the bottle should be placed
away from direct sunlight or secondary sunlight.
Shafts of light can reflect off kitchen sinks and shinny fridges.
If the customer cleans the bottle every month it will be
difficult for grime to build up at the base of the bottom bottle.
Covers for cooler bottles can be helpful.
Awesome coolers has no policy on covers and do supply them.
These are sold as an aid and not a guaranteed solution.
______________________________
BLACK SPECS
Black carbon can escape from the filter when it is either
brand new or old in it’s life span.
As with setting up a trial one must flush the filter
3 – 5 minutes to flush through all excess carbon
until the water exiting the filter is clear.
If black carbon is escaping the filter and accumulating at the base of the bottle in most cases the client is not cleaning monthly.
_____________________________
THE WATER DISPENSER
THE LED SCREEN
No power or lights
If you turn the power off and then on and no activation
sound is heard the problem usually is the fuse on the
main board, which you can replace.
If you turn the power off and then on and you hear an
activation beep but no lights are showing then the problem
is a burnt out diode on the main board.
Simply replace the main board.
______________________________
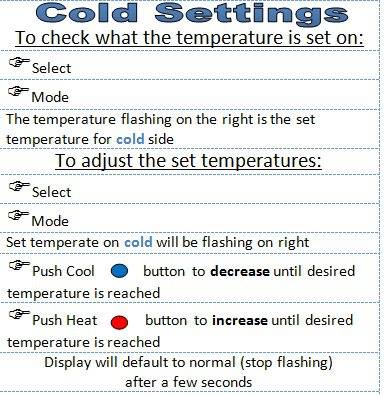
WATER FREEZINGE1 OR MACHINE BEEPING & COLD READER CHANGE
BT Machines run better set on at least 6 degrees and can be
known to freeze up even if showing 4 or 5 degrees: unless the
cold is already running over 10 degrees, get the customer to
set it for say 8 degrees and run for 24 hours to test.
In many cases this solves the problem and you can follow
up at next filter change. In other cases you will need to
change over the cold reader.
_____________________________
FS MACHINE
Ask the client to flick the green switch to the
opposite of what it is currently on.
The compressor “should shut off”.
If the cold then reads ER” or 2 or 3 degrees
you have solved the problem.
Tell the client to test for 24 hours and you will follow
up when filter is due if no further problem.
If the green switch is changed and you get a reading above 6 degrees you will still need to probably change the cold water reader.
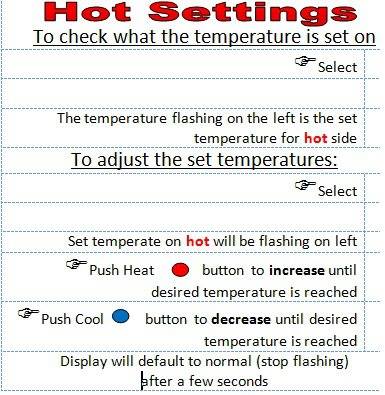
A machine beeping is due to it being, either too hot, too cold or empty. If beeping and E1” message on hot then check the connections to the LED screen as it may be loose.
If not, replace digital screen and main board.
In the majority of cases the cause is water freezing up.
To remedy firstly tell the customer to turn the cold off for 6 hours, set the cold temperature for 6 degrees and restart.
If F/S model check to make sure green switch is up the
same way as the amber power button.
If persists you may need to change the cold internal
reader as follows
Open machine.
- Unscrew 1 or 2 screws holding the
- reservoir and tilt back foe access.
- Gouge out the block of foam covering the reader (follow the wire)
- Pull out reader and wire (may need to clear
- silicon holding both in place)
- Replace internal reader (drop of silicon will hold in place but keep it away from the metal bullet and only at the entrance so it can be cleared in future if you need to replace again)
- Replace foam (again – silicon of “gap filling foam”
- is handy for holding in place)
- Re-connect end of internal reader wire to digi panel or rear switch depending on machine type.
_____________________________
THE CHILD LOCK
The child lock is one while part which encompasses the two levers for hot and cold and the hot disabling child lock.
https://www.awesomewater.com/collections/accessories/products/replacement-taps
Lock stiff or Broken: the slider knob of the child lock itself
can be jarred or tight, if physical pushing won’t budge it
simply remove child lock section entire as above and
replace with a whole new section.
Lever not connected on taps: if the lever is loose or limp, the
back of the plastic lever may not be attached to the internal
tap lever which rises and releases water.
Simply raise the dislodged lever and place it atop the rear
extension of the corresponding child lock section lever.
Check to see if the cause was a fatigued/broken rear extension which may be caused by the tap pushing against the foam.
Gouge away from foam as required.
The whole tap should now function.
Lever stiff or stuck: the hot or cold levers can become stuck or warped obstructing the easy transition of leverage to flow of water. Not to be confused with a lever with a broken spring
or dislodged from the black internal lever.
If the cold or hot lever has become stuck generally at 45 degrees
a pencil like object may be able to pry it loose by jarring
it into the exposed top section of the lever.
Sticky food, coffee stains and general neglect plus forceful
usage may make the lever stick.
If all endeavors fail to loosen the lever, open up the
machine and examine from the inside and replace
the child lock section entire if needed.
______________________________
THE TAPS
No water coming out of taps:
Firstly lift the bottle as they have been known to get an air seal.
Check the tap is not blocked but the most common cause is that the machine has frozen over and ice is blocking the flow or simply all the available water has been converted to ice.
Dripping tap: the tap may continually drip quickly filling
the drip tray and spilling out over time.
To fix replacing the tap is the only option.
https://www.awesomewater.com/collections/accessories/products/awesome-water-hot-tap-replacement
Hot water coming out of cold tap: ensure cold is on and working.
If hot is turned on and not used it can be put pressure on the one way valve and cause hot water to return into the cold reservoir or steam to vent back in via the side hole of the reservoir.
- Steam venting into the reservoir the vent hole
water level is above the vent hole.
If this is the case you should replace the float valve of the bottle.
B) Damaged non return valve replace valve
- Drain hot tank via rear draining plug and “open machine”
- Cut cable ties to valve
- Replace – be sure to install same direction (small end at bottom)
_____________________________
Plastic taste
Soaking and flushing new machines correctly should
clear most of the new plastic taste.
Some drivers like to use a couple of caps of vinegar in the
reservoir when setting up a water cooler for the first time.
This seems to completely clear the bi-carb residue and plastic taste.
If the machine is in a neglected state or the filter change is overdue the water could be contaminated and affect the taste.
Cleaning, filter changes or flushing will fix all taste issues.
In severe cases for older neglected machines, a full
sterilization may be required, see office for help.
______________________________
THE FRIDGE
RUSTED CABINET DOOR OR CABINET DOOR PIN: clean or replace.
Use Vaseline or similar on pin to prevent recurrence.
Broken seals: replace door
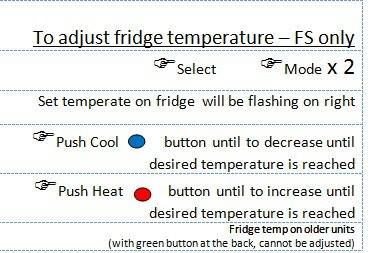
Fridge usage:
The default setting is power and green switch up the same way. Under this setting the temperature of the cold water tank is shown. To quick check the fridge internal temperature flick the green
switch down the degrees will now be displayed then reset
the switch to the default.
The fridge temperature varies depending on to how
much the compressor kicks in each day.
In an office with fifty staff the compressor will run more
often than in a office with two staff members which means
the fridge is usually cooler.
People who don’t drink a lot of water may complain
about a fridge that does not work.
Use the green switch to check the temperature.
The compressor should start.
Explain that the fridge works dependent upon water
usage, the more water usage the colder the fridge.
For best results keep the fridge fairly full.
Run extra water through the machine especially
at the start and end of day.
Milk is stored best by using 600ml carton, taking the
shelf out and keeping it near the back plate.
If the fridge temp is more important than the water
temp the green switch can be kept down.
That way the display will show the fridge temperature
and the compressor will kick in and out
depending on the fridge temperature.
NOTE: due to the way the gas pipes work compared to the water section customers need to be made aware that this may cause freezing of the water tank and should be a last option.
Frost build up on the refrigeration plate: as with all refrigeration products a build up of frost can accumulate on the
refrigeration plate over time.
This is not an indication of anything wrong with the cooler.
To fix the customer simply has to switch off the machine
for several hours to let machine defrost.
Then they must manually clean out fridge as standard maintenance.
______________________________
THE FEET:
The black rubber feet of the cooler are the only section
of the machine where bench top and freestanding differ
on a substantial level.
The bench-top has four elevated thick screwed in rubber feet,
whilst the free standing has six small black feet in conjunction
with four grey plastic feet like extensions of the cooler which
can act like feet depending on the surface.
An unstable machine can cause vibrations.
Check that all feet are in place.
Some, may be broken/ missing and need replacing.
Simply nudging it a centimetre in any direction may correct the problem. On uneven floors you may need to place some cardboard (from bottle box) under a foot as apart from vibrations it is important the cooler is level for the float valve to work properly.
On bench top feet can be partly screwed out to fix level.
Rubber feet can be changed easily for either BT or FS
so just keep spares on hand...
_____________________________
THE MAIN SWITCHS
At the back of the free standing cooler there are two switches, the amber power switch and the green fridge switch.
The bechtop model has only a yellow power switch.
The green switch is designed to alternate between reading
either the water temperature or the fridge temperature.
By setting it to the I position the compressor responds
to the temperature of the cold tank and shows the
reservoir temperature on the display.
By setting it to the II position the compressor responds to the fridge temperature and shows the temperature of the fridge on the display.
Faulty temperature reading on the cold or water freezing up:
Change the internal reader (see Led screen section)
Loud compressor noise: the compressor is a small piston
motor that sits on three springs in a pool of oil.
It vibrates up and down which generates that
archetypal fridge noise.
It is not usually for compressors to shudder or thud when
starting this may vary from cooler to cooler or throughout
the life of the cooler and is normal.
In some cases a cooler can have an extreme vibration
(you’ll know it) which is not easily fixed.
If the noise is louder than normal or characterized by buzzing or a quick thud when the compressor kicks in other factors may apply. Check with head office.
_____________________________
THE RESERVOIR:
The reservoir is the main stainless steel vessel that holds
the cold water. As it is the main component of the cooler.
Issues with it itself are varied and more so linked to
their parts and other problems.
Rust near the heat release hole: depending on the environment and water used in the customers residence rust can build up around the heat release hole which is on the side of the urn ¾ the way up.
This hole is open and structurally less resilient than the smooth stainless steel surface of the reservoir.
We recommend that when the driver cleans the machine
you use “Tuff Scrub” (isn’t as coarse as steel wool) to
remove any rust from the hole.
SPLIT OR CRACKED RESERVOIR:
A split or cracked in the side of the reservoir can occur
generally originating from the heat release hole.
The split is mainly vertical and once split; water
can leak in to the cooler causing damage.
Age, neglect, rusty or heavy water ate the causes for
this and to replace a entire reservoir is impractical.
In most cases replacing the machine is required and
needs to be checked with head office.
A machine that uses cold only rarely has this problem.
We understand it is more likely to occur in machines that have the hot on continually especially where it is not used much.
_____________________________
THE MAIN BOARD:
The main board holds most of the electrical critical system that control the flow of electricity and run the machine.
CORRISION: moisture and dust can cause corrosion and
blow various sides on the main board.
Simply replace the whole main board to fix the problem.
Vermin, mostly cockroaches and mice can leave filth in the area which can add to corrosion.
Blown fuse: usually on the main board.
Replace with 10 amp slow blow.
Occasionally cold be the fuse in the bottom fuse box.
That box has a wedge clip, so remove the
2 screws, lift and pull back to access.
Burnt out main board: we have had cases of transistors
on the main board fusing out which will melt the transistors
and sometimes the board itself.
In extreme cases it is possible for the customer to see or smell smoke. The important thing is to reassure them that the problem is easily fixed which it usually is by changing the main board over.
It seems faulty hot readers are sometimes the cause of the problem. If this occurs then change over the hot reader as well.
NO POWER: depending on old type or new type machine.
If new type, then first check the fuse at the back of the machine.
Otherwise it could be one of the following:
Fuse on main board
Bottom fuse on old style fuse box
Connection ribbon between digi and main board
Faulty power switch at back of machine
Shorting from water damage to wires (probs fuse box)
Loose wires
_____________________________
NOT HEATING PROBLEMS:
The thermostat (button shape with 2 blue wires at front of
hot pot) stops the machine from overheating and controls
the power on and off to the hot urn.
If the HOT is not working yet the screen still displays the red bars it is most likely the thermostat and or Hot reader that needs attention. Usually the thermostat button pops out when overheated. If this is the case then leave the thermostat in place as it is working properly. Best to change the HOT reader over as this is most likely the fault.
_____________________________
CHANGING HOT INTERNAL READER (located above thermostat)
For old types hot pot (internal element)
Undo black wire tie.
Pull out reader from the hot pot and disconnect from
Digi panel Replace wire and be sure bullet has
contact paste on it. Reconnect
For new type hot pot (external element)
Take 2 screws out
Replace reader and ensure plenty contact
paste at contact point
Press thermostat button
_____________________________
CHANGING THERMOSTAT
Detach both blue wires
Unscrew both screws (best use a magnetised screwdriver
as screws are small and easily dropped) and replace.
Use a small dab of contact electrical paste to ensure connection
Screw back in and re-connect.
(the wires work on either pin)
Ensure button on middle of thermostat is pressed in.
______________________________
THE SPINDLE
The spindle is the clear plastic disc inside the main reservoir.
This needs to be secured down as in some cases they get loose
and float up which means hot water will dribble or not flow
from the hot tap. Simply crimp the steel shaft or plastic
rod with pliers and it should hold.
Sometimes the steel tube rod is slightly bent thus making
it hard to remove the spindle to replace.
To rectify this place a Phillips head screw driver down the tube shaft of the centre and lean it until the metal tube is correctly aligned.
_____________________________
HOT POT – Shorting Problem
90% os shorting out or tripping mains problem are due to the hot coil in the hot pot being corroded somehow.
A good indicator is to check the water it is most
likely a faulty hot coil.
NB: you can tell which is the cause by if the machine turns on long enough for the cold compressor to kick in before it shorts then it is the cold causing it and cannot easily be repaired and must be returned to the warehouse. If it shorts out immediately the power goes on then it should be the hot.
______________________________
HOT POT CHANGING OVER PROCEDURE:
Drain hot pot via back plug
Unscrew hex nut and release drain hose by wriggling in.
(this can be a little troublesome in and out)
At the front of the grey plate release the left screw holding
plate to side panel (as this will make it easier to get
hot pot out and give you space to move)
Cut thin breather hose from hot pot to cold reservoir.
Release two screws on the top of hot pot.
These are located on top of plate under tank;
one will be under the foam.
Cut away to get the magnetic Phillips head screw driver to the screw or push the screwdriver straight through it.
HINT: use self tapping screw when
re-fitting as this will be much faster.
Release all wires on the front of the hot pot.
Release rubber hose leading from the cold
reservoir to non return valve and hot pot.
Take out hot pot
When changing hot pot is sure to replace thermo,
inter reader, return valve, hot coil with new parts,
as this will save coming back again.
When re-installing hot pot is careful to use plenty of heat transfer paste on thermostat and hot reader and be particularly careful when either attaching hoses or scraping the drain hose on metal as this may rupture the hose and cause a leak later.
_____________________________
HOTPOT
New style hot pot problems
You may have experienced the following faults: hot stoped
heating, burning plastic smell and in some cases leaking.
Most of this is due to the heating band slipping down the tank
and either burning the 1 way valve or the tube and or tripping
the thermostat which stops it heating.
The fix for existing machines is to open the front, loosen the brass bolt (need short Phillips head and 10mm ring spanner), lever the band slightly to loosen (or spread with pliers) then with long handled screw driver edge the band higher until touching the black foam. Tighten fully and reset thermostat if nec..
In some cases we are finding the aluminium
casing around the ring is loose.
This means that the insulation foam gets air
between and cannot do its job.
This will cause overheating and perhaps some smoke or burning smell. The hot will overheat and eventually pop the thermostat.
You will need to replace the heating ring in
this case or tighten the aluminium.
Awesome Water® Help Line And Repair Manual, written & published by Awesome Water®.
Copyright © 2005 - Awesome Water® - www.awesomewater.com - 1800 886 819
_______________________________________________________________
For Any Problem/Issue Not Listed Contact Us On 1800 886 819 or Email: admin@awesomewater,.net.au
_______________________________________________________________
